How to Use An Air Compressor: A Complete Guide
 How to Use An Air Compressor: A Complete Guide
drivrzone.com
How to Use An Air Compressor: A Complete Guide
drivrzone.com
Air compressors are fantastic tools that can make the most amateur of hobbyists capable of the same sort of home improvement repairs as professionals can do. They are relatively cheap, and will give you an extremely powerful return on your investment. All the same, they are complex tools, and shouldn’t be used lightly. Anyone who uses an air compressor should absolutely know what they are doing. If someone uses an air compressor who isn’t sufficiently prepared, then a number of different consequences might occur. At best, the amateur will mess up the job, and at worst they will hurt themselves or others. In order to make sure you know exactly what you’re doing when you’re using an air compressor, here is an in depth guide on how to use one.

Step 1: Check the Oil Level of the Pump
As with most types of mechanical machinery, an air compressor is reliant on oil to function properly. That’s why the first thing that you should do, before setting up the compressor at all, is to check the oil level. You should be able to find a dipstick in order to test the amount of oil; if it goes approximately two thirds up the stick, you probably have enough oil. Any less, and you’ll have to purchase compressor oil to use, available at almost any hardware store. It is possible that your compressor doesn’t use oil, and that you can skip this step. Generally, larger compressors will use oil, and smaller ones are less likely to need to. If you aren’t sure whether yours takes oil or not, you can always refer back to the owner’s manual.
Step 2: Attach the Hose
Before you turn the machine on, you’re going to need to do a few things to get the compressor ready. The first thing you will need to do is attach the hose which will be connecting the compressor to the tool to the compressor itself. You do this by finding the regulator valve, and attaching the hose there. It should be a valve located right next to a pressure gauge; it’s from here that you’re able to regulate how much air the tool is getting. Attach the hose here by inserting the hose’s pointed end into the valve, making sure that the connection is secure as you do so.
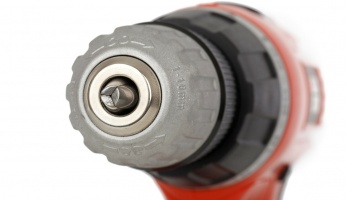
Step 3: Plug in the Tool to the Compressor
Now that the hose is attached to the compressor, you need to get the tool attached to have the whole assembly together. You want to grasp the tool firmly in one hand, and the hose in another. The two slide into each other, and then they are screwed into each other to lock into place. You should be able to tell the moment when the tool locks into the hose, but all the same, test it out to make sure that the connection is secure. Air compressors use high amounts of pressurized gas, which can be dangerous in the instance of a faulty connection.
Step 4: Plug in the Compressor
Now that you’ve got the compressor all put together, you can actually plug it in. Before you do, though, make sure the compressor is on a flat, sturdy surface. If it is, plug it into a 3-prong outlet. Be sure that the outlet is grounded; in other words, don’t use extension cords. If you do have to reach somewhere that’s inaccessible because of the location of the nearest outlet, it’s preferable to use another air tube to extend your reach than extension cords. To connect one air tube to another, just slide one of the sharper ends into the opposite end of the other tube; they are designed to interlock in much the same manner as the hose’s connection with the compressor.

Step 5: Test the Safety Valve
You should be able to find a safety valve on the compressor, near the hose line. Sometimes, the safety valve will have a ring attached to make it easier for you to grasp. Pull the safety valve; if you hear the hissing of air releasing from the compressor, then you know that it’s working. If you can’t hear any hiss, it’s probably not an indication of any problem, though; the real test is whether you’re able to easily insert the safety valve back in. Make sure that you do push the valve back in before starting up the compressor.
Step 6: Turn on the Compressor
Flip the switch to the compressor, once you’re sure that the compressor is ready to start up. Even though it will loudly spring to life, you won’t be able to use the compressor immediately. Before you’ll be able to use it in any capacity for power tool work, you’ll need to fill up the air tank.
Step 7: Fill Up the Air Tank
Once the compressor is running, it will be naturally building up pressure for you to use. There should be two gauges on the air compressor. One is the one you used to locate the regulator valve; at the moment, this valve should be non-responsive. There will be another, larger valve, however, that is responding. This valve is measuring the pressure of the air inside the tank. It should be slowly but steadily rising as the pressure in the tank fills up. Once the gauge has stopped moving, then the compressor has reached its maximum pressure capacity.
Step 8: Find Out What Pressure the Tool Needs
You should deal with this step while waiting for the previous step to finish up. You’re going to need to examine the tool you planning on using, in order to determine what the proper PSI to run it will be. Generally, such important information on any tool designed to be used with a compressor will be printed prominently on the tool itself. Check along the side of the tool, as well as on the bottom. If you cannot find the right air pressure printed on the tool itself, check the manual; you’ll definitely find the answer there. If the tool has a maximum pressure, you should avoid hitting that maximum, settling for a little bit underneath.
Step 9: Set the Control Valve to the Proper PSI
Once you’ve determined what the proper PSI is for the job, you can set the regulator valve at that number. The knob to regulate itself will be on the hose, but the gauge will be on the compressor. Slowly twist the knob counterclockwise, watching the rising pressure on the gauge, until you’ve hit your target range.

Step 10: Use Your Tool as Needed
Once you’ve got the proper PSI set, you can use your tool however you are intending to. The air compressor will make a lot of noise now; in particular, every once in a while, it will sound like it’s taking in more air. That’s okay; while you’re running it, the compressor’s function is to keep that air tank’s pressure up. It will continually fill up with more air, making it unnecessary to take any breaks to let the tank fill up.
Step 11: Let Out Condensation
Once you’ve finished with the job, you do need to be careful about the disassembly process. The first thing you need to do before you turn off the tank even, is to drain the condensation from the tank. On the bottom of the tank, you’ll be able to find the air drain valve; loosen this, and the tank will blast out any moisture that has collected in the process. Once the condensation is gone, you can seal it up again, even if it’s still audibly expelling air.
Step 12: Drain the Air Pressure
Before you turn it off, you’ll need to cut off the flow to the air hose. Once you do, you can turn off the machine. Switch the off switch, and the compressor will power down, and without the machine actively keeping the pressure up, the air pressure in the tank will dissipate. You can open up the pressure relief valve to make it empty up faster, but you’ll need to let the tank drain entirely before you put it away.
Step 13: Disassemble the Compressor
Before storing the compressor, you’ll want to break it into its requisite parts. Separate the tool and the air hose from the compressor, and unplug it. Put together all parts of the compressor neatly, so that it will be easy for you to access when you next need to use it.
Whenever you’re doing any construction of any kind, you should have proper safety gear, and that definitely includes using an air compressor. Make sure that you have good, sturdy eye protection, along with long sleeves, pants, and closed-toed shoes. If your compressor is the type to take oil, then you should be changing out the oil once a year. The rest of the time, when your compressor is not in use, it should be stored somewhere dry and cool.
Sources
- WikiHow – How to Use an Air Compressor
- Hunker – How to Use a Craftsman Air Compressor
- Mi-T-M – How to Use a 5 Gallon Electric Air Compressor