Grinding Brakes: A DIY Repair Guide
 Grinding Brakes: A DIY Repair Guide
drivrzone.com
Grinding Brakes: A DIY Repair Guide
drivrzone.com
Replacing rotors and disc brake pads is something that anyone with moderate experience working on cars can handle. However, beginners should not attempt this due to safety issues. Also, it is important for you to know that once you have begun the repair, more significant damage or wear might be found that will require work that isn’t in this article. Also, you may need to bleed the hydraulic brake lines.
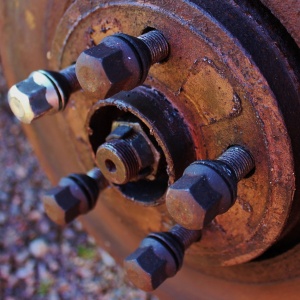
Parts and Tools
These are the very basic parts, materials, and tools that you will need in order to complete this repair.
Parts
- Rotors
- Brake hardware kit
- Brake pads
Tools
- Pair of jack stands and a floor jack
- Breaker bar
- Large C clamp or brake piston compressor
- Large hammer
- ½” ratchet and socket set
- Torque wrench
- Wire brush
- Pry bar or an old, large, flat screwdriver to use for prying
- ½” pneumatic impact wrench (this is optional)
Materials Needed
- Copper anti-seize lubricant
- Thread locker
- Silicone brake lubricant
- Paper towels or cotton rags
Before You get Started
Before you start this project, it would be wise to take a few safety precautions. This project might not require a lot in the way of tools, but it is critical that you use the right ones so that you will be able to prevent injuring yourself or damaging your vehicle. You should use gloves to protect your hands and safety glasses for eye protection.
Pro Tip
Some of the newer vehicles have anti-lock brakes that stay energized even if the vehicle isn’t running. Don’t try to disassemble the brakes on a car that has this without first deactivating the brakes. You can do this by finding and removing the fuse that powers the brakes. If you fail to do this, the brakes might activate by themselves and cause you to be injured.
Remember that anytime you are going to lift a vehicle, it needs to be on an even, flat surface. The vehicle should be in park and the parking brake should be on. Put a wood block or a wheel chock behind the tires to keep the vehicle from beginning to roll while you are lifting it.
Safety Tip
Professional technicians know that they shouldn’t ever get under a vehicle that has been lifted unless it is supported by jack stands. Check your owner’s manual to find out where to place them.
Once your safety has been ensured, you are ready to start on this project.
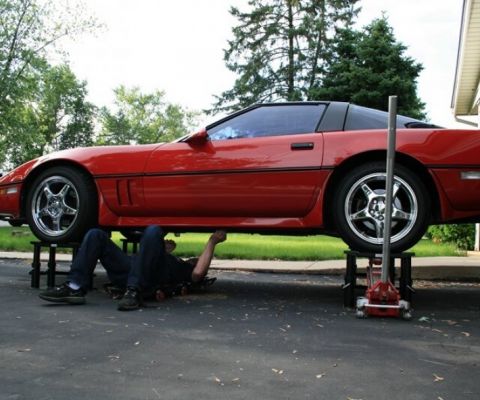
Lifting the Vehicle
Using a socket and a breaker bar, loosen the lug nuts on the tires – do not remove them yet.
Raise the front of the vehicle. To do this, find a solid lift point that is under the front end of the vehicle. Use the jack to lift the car. Place a jack stand under your recommended lift points and slowly lower the car onto the jack stands.
Leaving the jack in place, take the lug nuts off with either an impact wrench or your ratchet and set them aside. Take the wheel off and put it underneath the rocker panel for additional safety. Now, turn the steering wheel all the way to the side so that the brake caliper will be exposed, and removal will be easier.
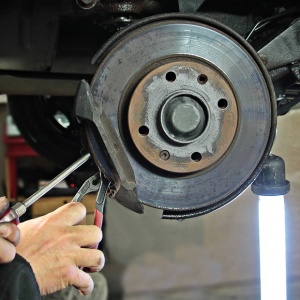
Removing the Caliper Bracket, Caliper, and Rotor
Using your breaker bar, get the two caliper bolts loose. Once they are loose, remove them with the ratchet.
Get the caliper apart from its bracket by using the pry bar to get it free. Suspend the caliper on a bungee cord or wire so that the hydraulic hose isn’t strained. Don’t just let it hang there.
Check the bolts you took off the caliper for wear or corrosion. Do the same with the slide pins. Replace or clean them as needed. Now you can slide the worn-out brake pads from the caliper brackets.
Using your breaker bar, loosen the 2 bolts on the caliper bracket, and take them out completely with the ratchet. Take the caliper bracket off of the steering knuckle and put it down somewhere nearby.
Take the old rotor off. It might resist if there is corrosion on the back of it. Use the hammer on the face of it while you are turning the rotor. Try not to hit the wheel studs. Once you have done this, the rotor should come loose.
Pro Tip
The rotor might be attached with a retaining screw. Be sure that you take this screw out before you try to take the rotor off. This often necessitates the use of a No. 3 Phillips head screwdriver. Smaller ones will round off the screw head. If that screw won’t turn, use a hand impact driver on it and it should break free. You might even be able to get it off by whacking the screwdriver with a hammer.
Clean the Caliper and Wheel Hub
Once you have removed the rotor, clean the corrosion from the wheel hub with sandpaper or a wire brush. Spray it down with brake cleaner and then wipe it dry with a paper towel or cotton rag. Repeat the process with the caliper bracket.
Your new rotor should come from the manufacturer with a coating of oil to protect it. Use the brake cleaner to get this oil off both sides of the rotor before you install it. After you have cleaned it, place it on the wheel hub and use one of the lug nuts to hold it in place. Next, replace the caliper bracket. Start on both of the bolts before you tighten either of them so that you can prevent any cross threading.
Take a look at the piston on the caliper. If there is any sort of residue, clean it with a rag that has been soaked in the brake cleaner. This will prolong its life. Try not to get the cleaner on the rubber bushings. Also, you will need to check on the amount of brake fluid that is in the fluid reservoir. If it is too high, you might need to remove a bit of it before you start to compress the caliper.
Reinstall the Caliper, Caliper Bracket, and Brake Rotor
Use one of the used brake pads and a large C clamp or the caliper piston compressor to compress the piston onto the caliper steadily and slowly until the piston actually bottoms out. Don’t force it though because the brake fluid can get backed up in the master cylinder and begin to overflow. You might want to loosen the screw on the caliper in order to release some of the pressure from the fluid while you are compressing the caliper. Be sure that you catch any of the fluid that is released from that bleeder screw. Sometimes, calipers need a special tool that will rotate the piston as opposed to compressing it. Typically, this will only be on rear disc brakes.
Remove the old hardware clips for the brakes and replace them with the new ones. Use the anti-seize lubricant on each of the surfaces where the brake pads will be in contact with the bracket of the caliper. Also apply this lubricant to the back of the brake pads and the new clips.
Safety Note
Don’t let the lubricant come into contact with the surface of your new brake pads.
Now, you will be ready to put the new brake pads into the bracket of the caliper. Clean the guide pins on the caliper before coating them with the lubricant.
Put the caliper into place over your brake pads and put in the caliper bolts.
Put the wheel back on and use your hand to tighten each of the lug nuts.
Repeat the process on the opposite side of your car.
Finishing Up
Once you have finished on both sides of the car, take the vehicle off of your jack stands, take the stands out of the way, and lower the vehicle back down to the ground and remove your jack. Use your torque wrench to tighten all of the lug nuts using the star pattern.
Start your car and then pump your brakes a few times in order to build up the pressure in the brakes. Check the level of the brake fluid again and if it is low, top it off. Now, all you need to do is take the car out for a test drive and make sure that the brakes work correctly.
Sources
- YouTube – How to Fix Grinding Brakes on Your Car (Rotors)
- RicksFreeAutoRepairAdvice.com – Grinding Brakes – Diagnose and Fix
- AxleAddict.com – 3 Most Common Brake Noises: Causes and How to Fix Them
- WikiHow.com – How to Fix Noisy Brakes