A Complete Guide on How to Change Motorcycle Oildrivrzone.com
We are all aware that our engines can’t operate smoothly without oil. It is one of the most critical things when it comes to keeping your engine purring like a kitten.
If you know the importance of oil, you might not be too surprised to find out that riders might tend to be a bit overeager when it comes to how often they change their oil.
It isn’t a bad thing to be too early with your oil changes, but it can last you a bit longer than you might think and if you wait and do it when it is necessary you will be able to save money.
Why Oil Needs to be Changed
In time, all oil will eventually break down. There are many factors to why this happens. However, the main reason is the heat that is generated by the process of combustion. When oil is subjected to enough of the heat, it will vaporize. This is what is called oil’s flashpoint.
Oil contamination is another reason we need to change it. There are 3 ways that our oil gets contaminated. One is that debris can get through the oil filter, another is the metal particles or shavings that are created due to metal to metal contact from the engine, and the third is the by products of the process of combustion, which will raise the acidity level of the oil. This can lead to corrosion and it can also leave deposits in your engine.
DrivrZone.com
Technology
Now that you know why we change our oil, you might think that any type of oil might struggle to deal with all of that. However, lubrication has changed through the years. The newest synthetic motorcycle oils have been designed in labs to specifications that ensure that it can handle the pressures that will be put on it.
Minimal Breakdown – Older and cheaper mineral oils that were petroleum-based begin breaking down almost as soon as you put them in a motorcycle. Synthetic oils don’t do this. This is due to the fact that they have a flashpoint that is much higher than those mineral oils, which means that they can take the heat, making the rate of breakdown that much slower.
In fact, synthetic oil of a high quality can last you for thousands of miles before it will begin to show signs of breaking down. This is because oils of this type are not solely refined like those mineral oils. They have been designed in a lab and had to meet specific requirements. In other words, a higher tolerance to engines and heat is built into the oil.
Filters
As good as things like oil, ring seals, and air filters are at keeping the levels of contamination down, there will typically be at least some debris in the oil that will need to be dealt with. Even though oil has additives that do a great job when it comes to holding the debris so that it doesn’t come into contact with components of the engine, it still will need to be addressed. This debris needs to be removed, and that is why you need an oil filter.
The oil filter catches most of this debris and contaminants as they flow through it. This permanently neutralizes them and prevents them from getting back into the oil and traveling through the engine.
The Frequency at Which Oil Should be Changed
You can generally find this information in the owner’s manual for your motorcycle. It should be clear to you now that the filtrations systems and oils of today were designed specifically to ensure that your engine is as protected and lubricated as possible. Knowing that the manufacturer of the engine would have taken this into account, it is safe to say that you don’t need to worry about it until the time that is specified in the manual.
Of course, this is assuming that you will be purchasing and using filters and oil that are of a high quality. As with most things, you will get what you pay for.
Does It Make a Difference if You Change Your Oil Early?
In a word – no. Just know that because of the ways that oils and filters are made today, you don’t have to. That being said, filters and oil aren’t that expensive and if it will give you peace of mind to change it early, then knock yourself out.
DrivrZone.com
How to Change Your Oil
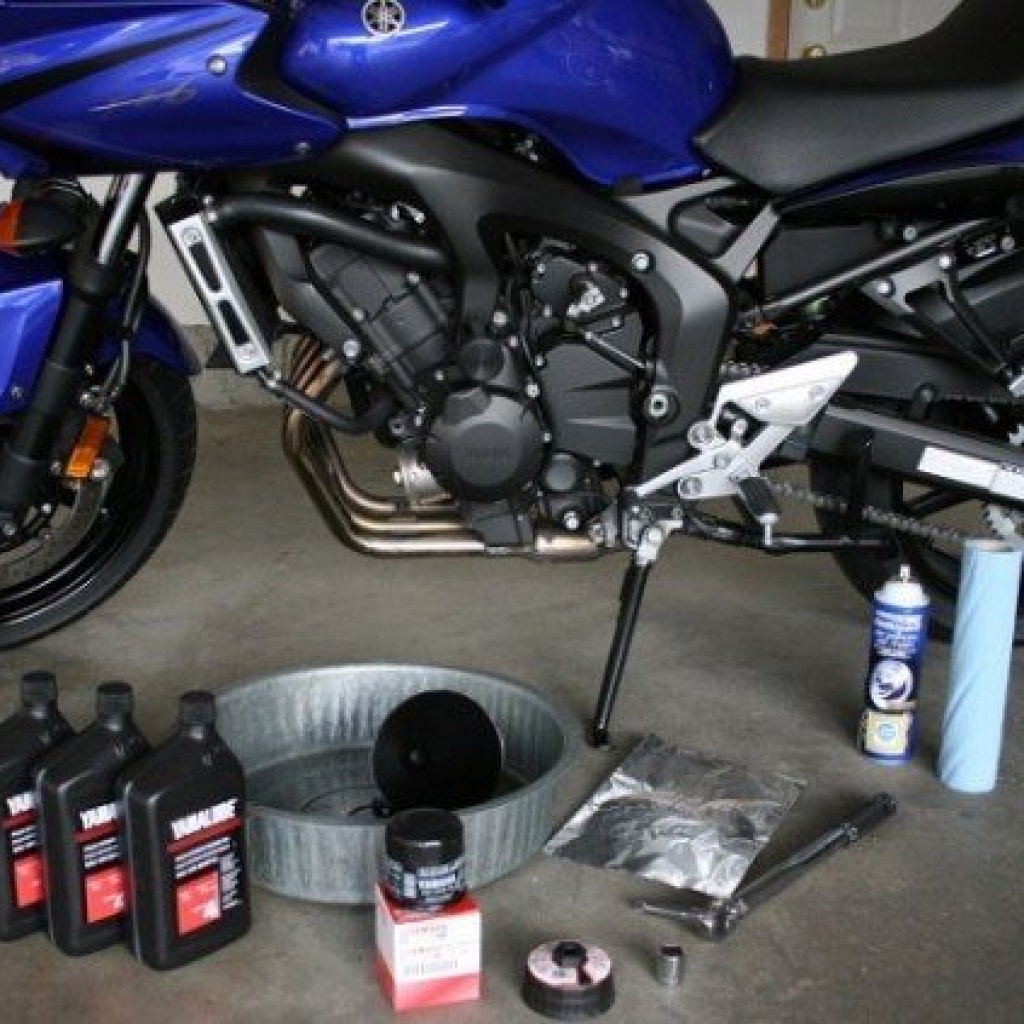
Set up your area. This is actually a critical step. You won’t want to leave in the middle of things to find rags, containers, tools, etc. while oil is draining from your bike and you have hands that are too grimy to touch anything.
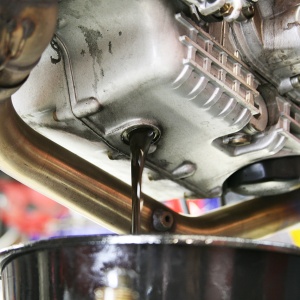
Put your bike on the rear, center, or side stand. Position the drain pan under the bolt. Try to imagine where the oil will go when it comes out and keep an eye on it as it drains. You might need to adjust where the pan is placed once the oil begins to flow more slowly. Using the proper tool, remove the bolt. Be careful not to strip it. If the bolt drops into the pan with the oil, just pick it up and try not to burn yourself.
Let the old oil finish draining and move on to the filter. Using a filter wrench, carefully unscrew the oil filter. If you don’t have a filter wrench, you can wrap a leather belt around it and use that. Try not to damage or dent the filter, because this could actually allow some of those contaminants to get back into your engine. Don’t worry if there is a bit of oil still in the filter. Just be advised that it might splash out, so ensure that there is something underneath it that will catch it. If it is on too tight and won’t budge, you might even consider jabbing a screwdriver into the side of it and using that as a lever to turn it.
DrivrZone.comYou will need to install a new crush washer for the drain plug. This might cost you around $1. Be sure to remove the old one. This new washer will help to save the threads in the oil pan because it will take a lot less torque to wrench it down onto the drain plug for the oil. If your drain plug washer is made from copper, it might need to be heated to make it softer. You can do this by heating it until it is as red as a cherry and then cooling it by putting it in water. This is called being annealed. It is a process that all copper washers need to go through before you install them, or they won’t compress correctly. This does include new copper washers.
Replace the drain bolt. Before you do though, make sure that it is clean and doesn’t have any grime or dirt on it. Keep in mind that it will typically be going into aluminum so remember not to tighten it too much. Take a look at your owner’s manual or take a trip to your local bike shop to find out the torque specs. Remember that when you use a torque wrench, Nm is not the equal to Ft-Lbs. Maybe you don’t have a torque wrench though. If that is the case, just install the plug until it is snug, but try not to over tighten it.
Get your new filter ready by filling it about ¼ of the way full with the new oil. Swish the oil around a bit to make sure that all of the material in the filter gets a bit of oil on it. Next, you will need to prep that rubber seal with just a bit of oil on the tip of your finger. This is critical. You need to get the entire seal wet. This ensures that it can make a good seal with your engine, while also making it easier to get off the next time you change the oil.
Clean the area on your engine where the filter goes. Make sure it is grime free and wipe a bit of the new oil in it so that the filter can get clean contact. Now, you will screw the new filter on. Don’t force it though. It should be able to go on with ease. Once it begins to get a bit more difficult to turn it, it will only need about another ¾ turn. Never over tighten your oil filter. Remember that it should never be tightened by anything other than your hand. Never use tools on it, unless you are using your torque wrench to get it to the specs set forth in the owner’s manual.
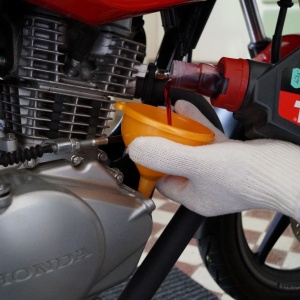
DrivrZone.comIf you haven’t already done it, move the old oil away from the area where you are working so that it doesn’t spill. Check your owner’s manual for the oil capacity for your engine and then use a funnel to add the oil. Stop when you are about ½ a quart away from the full capacity. Stop what you are doing and then check the oil level. Drain or add oil as needed. Make sure that you don’t over fill it because it will add unnecessary pressure to the seals in the engine, and this can make its life shorter. Remember that with motorcycles, you need to have the bike straight up and down as opposed to it being on the side stand when you check the oil level.
Now you are ready to clean up. Double check all of the bolts and caps to make sure that they are all in place. Most of the parts houses that sell motor oil will take your old oil and recycle it if you put it into the original containers. It might be messy, but it is bad for the environment if you dispose of it improperly. Make sure that you double check the oil level along with the fill cap tightness, drain bolt, and filter after you have gone for a ride.
 A Complete Guide on How to Change Motorcycle Oil
drivrzone.com
A Complete Guide on How to Change Motorcycle Oil
drivrzone.com